quantize
Once the original trained model has been imported into the loaded_net format using the load_model() API, it can be quantized using the afe.apis.loaded_net.LoadedNet.quantize() API.
The SiMa.ai software and silicon currently support 8-bit and 16-bit integer operations on the Machine Learning Accelerator (MLA) and floating-point operations on the Application Processing Unit (APU)
and Computer Vision Unit (CVU).
In general, pre and post-processing functions will be implemented on the APU and CVU whilst model layers such as convolution, pooling, etc. will run on the MLA.
The partitioning across compute units will be done automatically by the quantizer and only the parts that run on the MLA will be quantized.
Setting the Quantization Configuration Parameters
Quantization configuration in the ModelSDK involves setting up parameters for model quantization and enabling optional features like channel equalization.
The afe.apis.defines.default_quantization() parameters provide a baseline configuration that can be used to quantize a model in the default way.
These parameters can also serve as a starting point for creating custom quantization configurations.
Here is an example of how to apply the default quantization configuration:
from afe.apis.defines import default_quantization

# Quantize the model with default settings
quant_model = loaded_net.quantize(
    calibration_data=calib_data,
    quantization_config=default_quantization,
    model_name=<your model name>
)
Additionally, channel equalization is an optional preprocessing step that can be enabled to equalize the distribution of weight tensors across different channels,
potentially improving quantization performance. This option can be configured using afe.apis.defines.QuantizationParams.with_channel_equalization().
Defining Different Quantization Schemes
Use afe.apis.defines.quantization_scheme() to create a quantization scheme.
Note that for weights only symmetric quantization is supported, and for activations only per tensor quantization is supported.
from afe.apis.defines import quantization_scheme, default_quantization
import dataclasses

# define quantization schemes for weights and activations
symmetric_per_tensor_8_bits = quantization_scheme(asymmetric=False, per_channel=False, bits=8)
symmetric_per_channel_8_bits = quantization_scheme(asymmetric=False, per_channel=True, bits=8)
asymmetric_per_tensor_8_bits = quantization_scheme(asymmetric=True, per_channel=False, bits=8)

# set the quantization configuration to the default
quant_configs = default_quantization

# modify default to change weight quantization
quant_configs = dataclasses.replace(quant_configs, weight_quantization_scheme=symmetric_per_channel_8_bits)

# modify default to change activation quantization
quant_configs = dataclasses.replace(quant_configs, activation_quantization_scheme=symmetric_per_tensor_8_bits)


# quantize
quant_model = loaded_net.quantize(calibration_data=calib_data,
                                quantization_config=quant_configs,
                                model_name=<your model name>)
There is also a default int16 quantization config afe.apis.defines.int16_quantization() that often works better:
from afe.apis.defines import int16_quantization

quant_model = loaded_net.quantize(calibration_data=calib_data,
                                quantization_config=int16_quantization,
                                model_name=<your model name>)
Mixed-precision Quantization
To maximize a compiled model’s execution speed while achieving a chosen accuracy, the ModelSDK supports quantizing an FP32 model into mixed INT8 and INT16 precision.
To quantize a model with mixed precision you need to add layers/operators from your models that you are targeting for INT16 quantization. By default ModelSDK quantizes FP32 to INT8.
Therefore, the remaining layers/operators will quantize to INT8.
To add layers to the INT16 quantization scheme you will need to call with_custom_quantization_configs from
default_quantization and add INT16 targeted layers to quantization_config parameter of the quantize API.
In this form of quantization, the software automatically quantizes a model in different configurations and measures its accuracy, and then returns the best candidate found. This option is best used when the desired accuracy is between the accuracy achieved with INT8 and the accuracy achieved with INT16.
The function afe.apis.loaded_net.LoadedNet.quantize_with_accuracy_feedback() is intended to minimize the number of 16-bit nodes while reaching the target accuracy.
Failing to reach the target accuracy indicates an error, however, minor accuracy losses may occur due to the statistical nature of the accuracy calculation.
model = loaded_net.quantize_with_accuracy_feedback(
calibration_data, evaluation_dataset, quant_configs,
accuracy_score=accuracy, target_accuracy=0.89)
Below is an example code for resnet50 model to add in your code before the quantize() API call.
from afe.core.configs import QuantizationPrecision

# Quantize the loaded net setting quantization precision of some nodes to int16.
# User can provide the custom quantization config dictionary in the following form:
#   custom_config_dict = {'node_name': {'quantization_config_field': value}}
# For example, in order to set the precision of a certain node to int16, the user needs
# to provide the config as follows:
#   custom_config_dict = {'node_name': {'quantization_precision': QuantizationPrecision.INT_16}}
# User must get the node names from the SiMaIR graph.  To obtain node names from
# SiMaIR graph, user needs to run int8 quantization and get the names of nodes
# examining the .sima.json in netron.  It is user's responsibility to decide which
# nodes should be quantized with higher precision.

int16_nodes = [
    "MLA_0/conv2d_add_relu_0", "MLA_0/max_pool2d_1", "MLA_0/conv2d_add_relu_2",
    "MLA_0/conv2d_add_relu_3", "MLA_0/conv2d_add_4", "MLA_0/conv2d_add_5"
]
quant_configs = default_quantization.with_custom_quantization_configs(
    {int16_node: {'quantization_precision': QuantizationPrecision.INT_16} for int16_node in int16_nodes}
)

sdk_net = loaded_net.quantize(
    calibration_data=calibration_data,
    quantization_config=quant_configs,
    model_name="tut_resnet50"
)
You can verify whether the above layers/operators are added to INT16 by executing and saving the sdk_net output.
As shown below in tut_resnet_tensorflow.sima.json file search for any layer that you added in the INT16_nodes list.
You can see that in output, the input_int16 will be True for that layer/operator.
sima-user@docker-image-id:model_zoo/resnet50/sdk_net_manual_mixed$ ls -ltr
    total 100536
    -rw-r--r-- 1 sima-user sima-user 388338 Aug  1 15:18 tut_resnet_tensorflow.sima.json
    -rw-r--r-- 1 sima-user sima-user 102552052 Aug  1 15:18 tut_resnet_tensorflow.sima
sima-user@docker-image-id:model_zoo/resnet50/sdk_net_manual_mixed$ vi tut_resnet_tensorflow.sima.json
    "class_name": "MLA_0/Conv2DAddActivation_5",
                            "name": "MLA_0/conv2d_add_5",
                            "inbound_nodes": [
                            ...
                            ...
                                "activ_attrs": null,
                                "input_int16": true,
                                "msb_left_shift": true,
Defining a Different Calibration Method
When configuring the quantization parameters users can select from the calibration methods as listed below. The MSE method
has been observed to consistenly provide better results and therefore has been set as the default calibration method.
The helper function afe.apis.defines.CalibrationMethod.from_str() helps to construct a calibration method.
For example, the following code changes the calibration method in the default quantization configuration:
# Use MSE calibration method
quant_configs = default_quantization
calibration_method = CalibrationMethod.from_str('mse')
quant_configs = quant_configs.with_calibration(calibration_method)
sdk_net = loaded_net.quantize(calibration_data=calibration_data,
                            quantization_config=quant_configs,
                            model_name="test_model")
# Use percentile calibration method with custom percentile value and number of bins
quant_configs = default_quantization
calibration_method = HistogramPercentileMethod(91.0, 2048)
quant_configs = quant_configs.with_calibration(calibration_method)
sdk_net = loaded_net.quantize(calibration_data=calibration_data,
                            quantization_config=quant_configs,
                            model_name="test_model")
from afe.apis.defines import default_quantization,MinMaxMethod,MovingAverageMinMaxMethod,HistogramMSEMethod,HistogramEntropyMethod,HistogramPercentileMethod
import dataclasses

# set the quantization configuration to the default
quant_configs = default_quantization

# modify the default quantization to use moving average min-max calibration
quant_configs = dataclasses.replace(quant_configs, calibration_method=MovingAverageMinMaxMethod())

# quantize
quant_model = loaded_net.quantize(calibration_data=calib_data,
                                quantization_config=quant_configs,
                                model_name=<your model name> )
Defining INT32 Quantization for Final MLA Layer
The ModelSDK supports quantization of FP32 models with mixed precision. That is, you need to add layers/operators from your models targeting int16 quantization. By default, the FP32 model will quantize FP32 into int8 precision and the remaining layers/operators will be quantized to int16 precision.
To add layers to the int16 quantization scheme, call with_custom_quantization_configs from default_quantization and add int16 targeted layers to
quantization_config parameter of the quantize API.
- afe.apis.defines.QuantizationParams.with_custom_quantization_configs(custom_quantization_configs: Dict[NodeName, Dict[str, Any]]) QuantizationParams
Set custom quantization options for select nodes. The custom_quantization_configs is a dictionary specifying a node name with new value in QuantizationConfigs. This API is used in the following two scenarios (see examples below): #. Enable the int32 output of the last convolution node. #. Enable mixed-precision quantization.
Users must get the node names from the SiMa IR graph. To obtain node names from a SiMa IR graph, a user must run int8 quantization of a model and get the names of nodes by saving and examining the .sima.json file in Netron.
- Returns:
Returns the quantization configuration with the custom quantization config.
Below is an example of int8 quantization but the last convolutiuon node is quantized as int32.
Assuming MLA_1/conv2d_add_84 is the node name of the last layer of a model:
custom_quantization_configs = {
"MLA_1/conv2d_add_84": {"output_int32": True}
}
quant_configs = default_quantization.with_custom_quantization_configs(
    custom_quantization_configs
)
The below is an example of mixed-precision quantization where most layers are quantized as int8 and the remaining layers are quantized as int16.
int16_nodes = [
"MLA_0/conv2d_add_relu_0",
"MLA_0/max_pool2d_1",
"MLA_0/conv2d_add_relu_2",
"MLA_0/conv2d_add_relu_3",
"MLA_0/conv2d_add_4",
"MLA_0/conv2d_add_5"]
quant_configs = default_quantization.with_custom_quantization_configs(
{
int16_node: {'quantization_precision': QuantizationPrecision.INT_16}
for int16_node in int16_nodes
}
)
Overriding Configuration Parameters of Quantization
Use the following APis to override configuration parameters of quantization.
afe.apis.defines.QuantizationParams.with_activation_quantization()afe.apis.defines.QuantizationParams.with_weight_quantization()afe.apis.defines.QuantizationParams.with_unquantized_nodes()afe.apis.defines.QuantizationParams.with_requantization_mode()
The following is an example of how to construct quantization parameters. It overrides how activations are quantized, sets requantization mode, and enables bias correction, while leaving other settings at their default value.
requantization_mode = RequantizationMode.tflite
asymmetric_pertensor_int16 = quantization_scheme(asymmetric=True, per_channel=False, bits=16)
enable_bias_correction = True
quant_config = default_quantization \
    .with_activation_quantization(asymmetric_pertensor_int16) \
    .with_requantization_mode(requantization_mode) \
    .with_bias_correction(enable_bias_correction)
Code Template for Cycling through Quantization Options
This section describes one possible method of running all quantization options for a single model.
# define quantization schemes & calibration methods
symmetric_per_tensor = quantization_scheme(asymmetric=False, per_channel=False)
symmetric_per_channel = quantization_scheme(asymmetric=False, per_channel=True)
asymmetric_per_tensor = quantization_scheme(asymmetric=True, per_channel=False)

weights_schemes = [symmetric_per_channel,symmetric_per_tensor]
activation_schemes = [symmetric_per_tensor,asymmetric_per_tensor]
cal_methods = [MinMaxMethod(), MovingAverageMinMaxMethod(), HistogramMSEMethod(1024), HistogramEntropyMethod(), HistogramPercentileMethod(99.9)]
Track the best results in a variable:
# set initial best accuracy to 0
current_best_accuracy = 0.0
Cycle through all options, evaluate each time and save the quantized model if accuracy improves:
quant_configs = default_quantization

for c in cal_methods:
    quant_configs = dataclasses.replace(quant_configs, calibration_method=c)

    for w in weights_schemes:
        quant_configs = dataclasses.replace(quant_configs, weight_quantization_scheme=w)

        for a in activation_schemes:
            quant_configs = dataclasses.replace(quant_configs, activation_quantization_scheme=a)

            # quantize
            quant_model = loaded_net.quantize(calibration_data=calib_data,
                                        quantization_config=quant_configs,
                                    model_name=<your model name>)

            # iterate over test data to evaluate quantized model
            correct=0
            for input_name in model_ip_names:
                for i in range(0,test_images):
                    inputs = dict()
                    inputs[input_name] = _preprocessing(data[i])


            # Evaluate the quantized net - argmax post-processing
            quantized_net_output = np.argmax(quant_model.execute(inputs))

            if labels[i]==quantized_net_output:
                correct+=1

            accuracy = correct/test_images
            # save model if accuracy improved
            if accuracy > current_best_accuracy:
                current_best_accuracy = accuracy

            quant_model.save(model_name = model_name, output_directory = saved_model_directory)
Saving and Loading a Quantized Model
We can save and load the quantized model to disk as follows:
- Model.save(model_name: str, output_directory: str = '', *, log_level: Optional[int] = logging.NOTSET)→ None
Saves a Model. This API will generate two files: a SiMa.ai file for the saved network and a JSON file that can be displayed using Netron. The SiMa.ai file name is created by appending
.simatomodel_name, if it does not contain the extension.sima. The JSON file name is created by appending “.json” to the sima file name after the extension “.sima”. Both files are put into output_directory, which is by default the current working directory.- Parameters:
model_name – Required. The name to save the model as.
output_directory – The default values is
/.. The folder to save the model in.log_level – The default value is
logging.NOTSET. The type of logging to have during the saving of the model.
- Model.load(model_name: str, network_directory: str = '', *, log_level: Optional[int] = logging.NOTSET)→ Model
Loads a Model from a sima file. The file name to load is created by appending “.sima” to the model name, if it does not have the extension “sima”. It is loaded from network_directory, which is by default the current directory.
- Parameters:
model_name – Required. The name of the model to be loaded.
network_directory – The default values is
/.. The folder to load the model from.log_level – The default value is
logging.NOTSET. The type of logging to have during the loading of the model.
quant_model.save(model_name = model_name,
                output_directory = saved_model_directory)
This will create two files: model_name.sima and model_name.sima.json which are wrtten to the folder specified by output_directory. If no output directory is given, the files are written to the current working directory.
The JSON file can be opened for viewing using the third-party Netron tool.
TFLite Pre-Quantized Support
The ModelSDK is able to ingest a model that was previously quantized using TFLite. The model is first imported using the load_model() API function and then converted using .convert_to_sima_quantization() to prepare for compiling. Any floating-point computation in the model will remain floating-point and will not run on the MLA.
This function converts a loaded pre-quantized model into a Model, using the quantization that was provided in the input model. The model should have been quantized prior to loading. Any floating-point computation in the model will remain floating-point and will not run on the MLA.
- LoadedNet.convert_to_sima_quantization(*, requantization_mode: RequantizationMode = RequantizationMode.sima, model_name: str | None = None, log_level: int | None = logging.NOTSET) Model
- Parameters:
requantization_mode – Determines what set of arithmetic approximations to use in ModelSDK
model_name – If given, is used as the name of the returned model.
log_level – Default is logging.NOTSET. Sets the logging level for this API call as described in the Logging section.
- Module:
LoadedNet
- Exceptions raised:
A pre-quantized operator cannot be converted to a SiMa quantized operator.
This example shows how to load and convert a pre-quantized TFlite model that has a single input named input_1 of shape 1,224,224,3:
# imports
from afe.load.importers.general_importer import ImporterParams, tflite_source
from afe.apis.loaded_net import load_model
from afe.ir.tensor_type import ScalarType
from afe.ir.defines import QuantizationFlavor

model_path='path/to/quantized/tflite/model'

# input shapes dictionary - NHWC format
# each key,value pair defines an input name and its shape
input_shapes = {'input_1': (1,224,224,3)}


# input types dictionary
# each key,value pair defines an input and its type
input_types = {'input_1': ScalarType.uint8}

# importer parameters
importer_params: ImporterParams = tflite_source(model_path=model_path,
                                                shape_dict=input_shapes,
                                                dtype_dict=input_types)

# load the model
loaded_net = load_model(importer_params)

# Convert quantized model - default is QuantizationFlavor.sima
quant_model = loaded_net.convert_to_sima_quantization()

# or use TFLite flavor..
#quant_model = loaded_net.convert_to_sima_quantization(quantization_flavor=QuantizationFlavor.tflite)


# save the quantized model
quant_model.save(model_name = model_name,
                output_directory = saved_model_directory)
The ModelSDK generally uses different quantized arithmetic than in other frameworks. Conversion will introduce differences due to rounding and other approximations. Two main quantization “flavors” are supported:
TFLite Quantization |
Description |
|---|---|
QuantizationFlavor.sima (default) |
An efficient form of arithmetic that may sometimes sacrifice accuracy. Higher performance with possible loss of precision. |
QuantizationFlavor.tflite |
Performs arithmetic as described by TFlite documentation.It involves the operations multiply, shift, round, and add. Less performance but may be more accurate. |
It is recommended to try using the default quantization flavor, and if the model’s accuracy is not sufficient, then use QuantizationFlavor.tflite.
Per-Layer Quantization Statistics
Given the FP32 and quantized versions of an ML network, ModelSDK has the ability to report per-layer quantization statistics. The API function to invoke this feature is shown below:
- Model.analyze_quantization_error(evaluation_data: Iterable[InputValues], error_metric: Metric, *, local_feed: bool, log_level: int | None = logging.NOTSET)
- Module:
Model
This function is useful for determining how each layer of the quantized model contributes to the overall error.
- Parameters:
evaluation_data – A Python Iterable that provides data samples for the error analysis.
error_metric – String. Defines the error calculation method: * mae: Mean absolute error * mse: Mean squared error * psnr: Peak signal-to-noise ratio
local_feed – Boolean. See description below.
log_level – Default is logging.NOTSET. Sets the logging level for this API call as described in the Logging section.
simulated_arm – Do not use, leave at default value.
# load FP model
loaded_net = load_model(params)

# quantize
quant_model = loaded_net.quantize(calibration_data=calib_data,
                                quantization_config=default_quantization,
                                model_name=model_name)


# run per-layer analysis
quant_model.analyze_quantization_error(evaluation_data=test_data,
                                    error_metric='mae',
                                    local_feed=True)


# save
quant_model.save(model_name = model_name,
                output_directory = saved_model_directory)
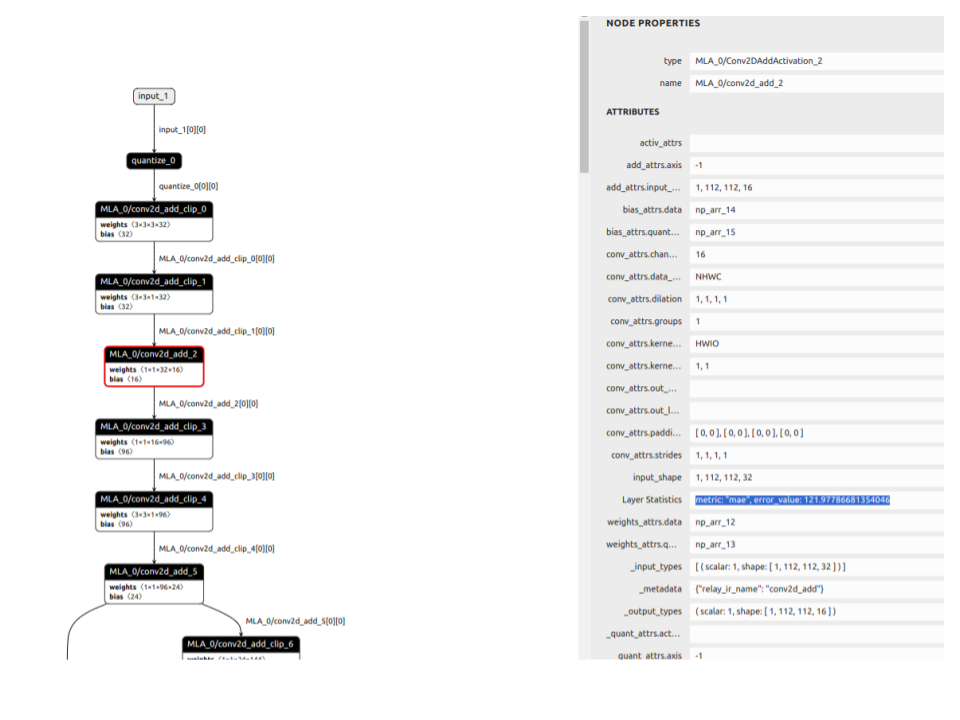
Once the model is saved to disk, the _model_name_.sima.json file will contain the error values for each layer. These can be seen by examining the JSON file with a text editor and searching for the “layer Statistics” string:
"_status": "SIMA_QUANTIZED",
"Layer Statistics": {
    "metric": "mae",
    "error_value": 3.9165286500938237,
    "__decode_key__": "LayerStats"
},
..or by opening the JSON file with Netron, click on the layer in model digaram and view the ‘Layer Statistics’ field:
Note
It is not currently possible to run per-layer quantization statistics on a quantized model that has first been saved to disk and then loaded. It must be run on a model that has just been quantized using the .quantize() API.
local_feed=True: The floating-point model is passed the evaluation data as defined by theevaluation_dataargument. The input of each node in the quantized network is fed the output data from the preceding node in the floating-point network and the output of the quantized node is dequantized and compared to the output of the equivalent node in the floating-point network - the error value is calculated as per the chosen metric. The displayed error value is the error value for that particular node only,local_feed=False: The quantized model and the floating-point model that it was generated from are passed the same identical set of evaluation data as defined by theevaluation_dataargument. The output of each node of the quantized model is dequantized and compared to the output of the corresponding node in the floating-point model - the error_value in the JSON file is the error of cumulative error of the quantized network up to that particular node (calculated as per the chosen metric). The error_value shown in the last node will be the cumulative error value of the entire quantized network.
Executing Loaded and Quantized Models
With the afe.apis.loaded_net.LoadedNet.execute() API, the ModelSDK allows quantized models to be executed in software with user-supplied input data so that the results can be evaluated. The quantized model is executed using a software implementation of the quantized operators.
The model is executed with a single set of input tensor values and the output tensor values are returned. It does not simulate execution on the processor.
The ModelSDK allows users to evaluate the accuracy of quantized models using the afe.apis.model.Model.execute() API.
(Default method) Bit-accurate evaluation using Numpy routines in ML kernels - specify
fast_mode=FalseinModel.execute()API.(Second method) Bit-approximate evaluation using Tensorflow-optimized code - specify
fast_mode=TrueinModel.execute()API.
The following code shows an example of how to use the afe.apis.model.Model.execute() API. In this example we have a numpy file of pre-processed data samples which are fed into the quantized model. The model has a single input input_1 and a single output:
 1# quantize
 2quant_model = loaded_net.quantize(calibration_data=calib_data,
 3                                quantization_config=quant_configs,
 4                                model_name=model_name)
 5
 6
 7# read numpy file of preprocessed data & labels
 8dataset_f = np.load('preprocessed_data.npz')
 9test_data= dataset_f['x']
10labels = dataset_f['y']
11
12
13inputs = dict()
14fp32_correct = 0
15quant_correct = 0
16# iterate over all test data
17for i in range(test_images):
18
19    # key=input name, value=data sample
20    inputs['input_1'] = data[i]
21
22    # execute quantized model - returns a list of ndarray
23    tvm_fp32_model_out = loaded_net.execute(inputs)
24    quant_model_out = quant_model.execute(inputs, fast_mode=True)
25
26    # argmax
27    fp_32prediction = np.argmax(tvm_fp32_model_out[0])
28    quant_prediction = np.argmax(quant_model_out[0])
29
30    # check output
31    if fp_32prediction == labels[i]: fp32_correct+=1
32    if quant_prediction == labels[i]: quant_correct+=1
(Third method) Bit-accurate evaluation of a quantized model in Accelerator Mode. This method executes a model on the SiMa development kit which must be connected to a network.
- Model.execute_in_accelerator_mode(input_data: Iterable[InputValues], devkit: str, *, username: str = cp.DEFAULT_USERNAME, password: str = '', batch_size: int = 1, compress: bool = True, tessellate_parameters: TessellateParameters | None = None, log_level: int | None = logging.NOTSET, l2_caching_mode: L2CachingMode = L2CachingMode.NONE) List[np.ndarray]
- Module:
Model
Invoke the function
Model.execute_on_accelerator_mode()with a list of pre-processed images. The API first compiles the model into an .lm file, and then obtains inference results by running the .lm file on the development kit.- Parameters:
input_data – The model is executed with a single set of input tensor values and the output tensor values are returned.
devkit – The URL for the development kit.
username – User login credential on the development kit.
password – User login credential on the development kit.
batch_size – Batch size to use in the compiled model.
compress – A flag to enable/disable DRAM data compression in the compiled LM file.
log_level – This sets the logging level for this call as described in the Logging section.
tessellate_parameters – Reserved parameter and takes default value.
l2_caching_mode – Reserved parameter and takes default value.
  1    import os
  2
  3    import cv2
  4    import numpy as np
  5    import argparse
  6    import time
  7    import pickle as pkl
  8    from typing import Any
  9    from afe.apis.defines import default_quantization
 10    from afe.apis.loaded_net import load_model
 11    from afe.core.utils import convert_data_generator_to_iterable, length_hinted
 12    from afe.ir.tensor_type import ScalarType
 13    from afe.load.importers.general_importer import tensorflow_source
 14    from afe.apis.release_v1 import DataGenerator
 15    from afe.apis.error_handling_variables import enable_verbose_error_messages
 16
 17    """
 18    Script for quantizing, compiling and running model in accelerator mode.
 19    """
 20
 21    MODEL_DIR = './UR_pb_resnet50-v1.5_fp32_224_224.pb'
 22    DATASET_DIR = './imagenet/val224.pkl'
 23    OUTPUT_DIR = './output'
 24
 25    DAVINCI_HOSTNAME = ""
 26    DAVINCI_USERNAME = "sima"
 27    DAVINCI_PASSWORD = ""
 28
 29    NUM_SAMPLES = 10
 30
 31
 32    def pre_process_func(image: np.ndarray) -> np.ndarray:
 33    from tensorflow.keras.applications.imagenet_utils import preprocess_input
 34
 35    img = image.transpose([1, 2, 0]).astype(np.float32)
 36    img = preprocess_input(img)[:, :, ::-1]
 37    img = cv2.resize(img, (224, 224))
 38    return img
 39
 40
 41    def load_pickle(path: str) -> Any:
 42    with open(path, 'rb') as f:
 43    v = pkl.load(f)
 44    return v
 45
 46
 47    def _create_calibration_data():
 48    dataset = load_pickle(DATASET_DIR)
 49    input_generator = DataGenerator({"input_tensor": dataset['data']})
 50    # Apply the preprocessing function to the dataset
 51    input_generator.map({"input_tensor": pre_process_func})
 52    input_iterable = convert_data_generator_to_iterable(input_generator,
 53                                                    length_limit=NUM_SAMPLES)
 54    return input_iterable
 55
 56
 57    def main(model_path: str, hostname: str, username: str, password: str, enable_verbose_message: bool):
 58    print("SiMa ModelSDK tutorial example of running ResNet50 model in Accelerator Mode")
 59
 60    if enable_verbose_message:
 61        enable_verbose_error_messages()
 62
 63    os.makedirs(OUTPUT_DIR, exist_ok=True)
 64    model_name = os.path.split(model_path)[1]
 65    model_prefix = os.path.splitext(model_name)[0]
 66
 67    # Models importer parameters
 68        input_name = "input_tensor"
 69        output_names = ["resnet_model/dense/BiasAdd"]
 70        input_shape = (1, 224, 224, 3)
 71        input_dtype = ScalarType.float32
 72        input_shapes_dict = {input_name: input_shape}
 73
 74    # refer to the SDK User Guide for the specific format
 75        importer_params = tensorflow_source(model_path, input_shapes_dict, output_names)
 76        loaded_net = load_model(importer_params)
 77
 78    # quantization with real training data samples
 79    # Note that quantization data is ALWAYS NHWC
 80        calibration_data = _create_calibration_data()
 81
 82        print("Quantizing the model.")
 83        model_sdk_net = loaded_net.quantize(length_hinted(NUM_SAMPLES, calibration_data),
 84                default_quantization,
 85                model_name=model_prefix,
 86                arm_only=False)
 87
 88    saved_model_directory = "sdk"
 89    model_sdk_net.save(model_name=model_name, output_directory=saved_model_directory)
 90
 91        print("Executing quantized model in accelerator mode.")
 92        input_data = _create_calibration_data()
 93        start_time = time.time()
 94        outputs = model_sdk_net.execute_in_accelerator_mode(
 95        input_data=length_hinted(NUM_SAMPLES, input_data),
 96        devkit=hostname,
 97        username=username,
 98        password=password)
 99        end_time = time.time()
100        print(f"Model is executed in accelerator mode. Elapsed time: {end_time - start_time} [s].")
101
102        print("End of tutorial example of ResNet50 in Accelerator Mode.")
103
104
105    if __name__ == "__main__":
106        parser = argparse.ArgumentParser(description="Script with optional arguments")
107        parser.add_argument('--model_path', type=str, default=MODEL_DIR)
108        parser.add_argument('--hostname', type=str, default=DAVINCI_HOSTNAME)
109        parser.add_argument('--username', type=str, default=DAVINCI_USERNAME)
110        parser.add_argument('--password', type=str, default=DAVINCI_PASSWORD)
111        parser.add_argument('--enable_verbose_message', action='store_true', help="Enable verbose messages")
112        args = parser.parse_args()
113        main(args.model_path, args.hostname, args.username, args.password, args.enable_verbose_message)
Large Tensor Models
In Machine Learning there are performance limitations when executing large model sizes on the hardware. When a model exceeds the device’s internal memory capacity, it is classified as a large tensor model.
SiMa’s ModelSDK can also have limitations in handling and compiling large tensor models. The memory management capabilities of SiMa.ai in both software and hardware allow for the execution of models with a large number of parameters by efficiently storing intermediate activations. The compilation time for large tensor models can range from minutes to hours, depending on the model’s complexity. In these cases, the MLA compiler attempts to store intermediate tensors in DRAM, which incurs a performance loss, but compilation remains successful.
The MLA compiler optimizes execution by storing intermediate tensors in L1 and L2 memory, but when tensors exceed available space, they are stored and fetched from DRAM, further impacting performance. The compilation time is also proportional to the number of layers, and the compiler splits large layers into sub-layers, increasing the overall compilation time.