Configure Serial Connection
In a standalone setup, regardless of how the DevKit obtains an IP address, it is essential for the developer to establish a connection via the serial interface. This ensures continuous access to the DevKit, allowing the developer to perform necessary tasks even if the network connection is lost.
Depends on the operating system of the developer’s computer, there are different ways to connect to the DevKit via the serial interface.
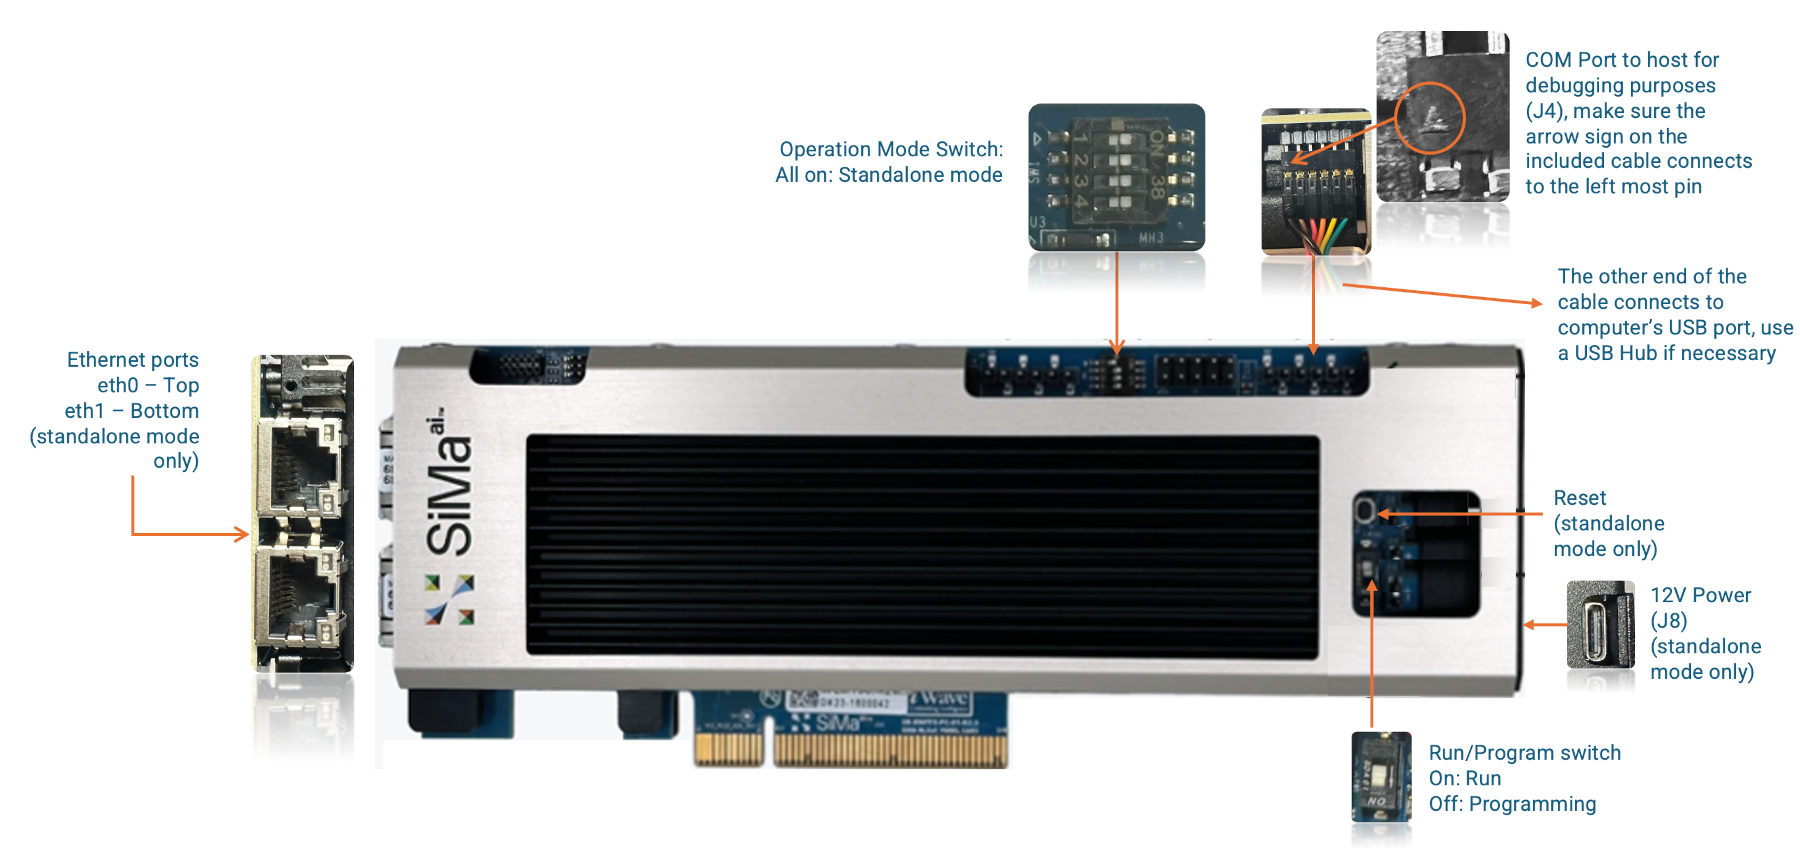
Make sure the Operation Mode Switch, Run/Program Switch are set according to the diagram above then power on the DevKit. Use the included serial cable to connect the DevKit to your computer:
One end connects to the DevKit’s serial port. Make sure the triangle sign on the flat connector aligns with the left most pin on the DevKit.
The other end connects to the computer’s USB Type-A port, use a USB Hub if necessary.
For any terminal software, set the following parameters when connecting to the DevKit:
Baud rate: 115200
8 data bits
No parity
1 stop bit
Set hardware flow control to No/OFF.
To connect to the DevKit via a serial terminal on Windows, follow these steps:
Identify the COM Port:
Open Device Manager → Expand Ports (COM & LPT).
Look for an entry like USB Serial Port (COMx).
Install and Open a Serial Terminal:
Use PuTTY (Download from [putty.org](https://www.putty.org/)) or Tera Term.
Set the connection type to Serial.
Enter the correct COM Port (e.g., COM3).
Set Baud Rate to 115200.
Click Open to start the connection.
On a Mac machine, we will use screen as the terminal emulator which has been tested and is known to work well.
Steps
Install screen using the following command:
On most Mac OS X versions,
screenis already installed. If not, you can install it using Homebrew:brew install screenConnect to the serial port:
Copy and paste the following code in your terminal to connect to the serial port:
bash -c 'port=$(ls /dev/tty.usbserial-* /dev/cu.usbserial-* 2>/dev/null | head -n 1) && [[ -n "$port" ]] && screen "$port" 115200 || echo "No USB serial device found!"'To exit, press
Ctrl + A, thenK, theny.
On a Linux machine, we will use picocom as the terminal emulator which has been tested and is known to work well.
Steps
Install picocom using the following command:
sudo apt-get install picocomConnect to the serial port:
Copy and paste the following code in your terminal to connect to the serial port:
port=$(ls /dev/ttyUSB* 2>/dev/null | head -n 1) && [[ -n "$port" ]] && sudo picocom -b 115200 --databits 8 --parity n --stopbits 1 "$port" || echo "No USB serial device found!"To exit, press
Ctrl + A, thenCtrl + X.
Once prompted to log in to the serial port console, use the default username sima and password edgeai.
After establishing the serial connection, proceed to configure the DevKit’s network by following the Configure DevKit’s Network settings.