Run Demos
Before building the first pipeline, try one of the preconfigured demos. SiMa provides three distinct demo experiences:
Edgematic 🔥 is a state-of-the-art, web-based development platform for Edge AI applications. The developer can quickly explore the demo by dragging and dropping a prebuilt pipeline with just a few clicks.
Run a multi-channel Vision AI demo pipeline on the DevKit using the OptiView.
Run a Large Language Model demo on the Modalix platform using sima-cli. Experience cutting-edge multimodal AI running on SiMa’s high performance power efficient Modalix platform.
Follow the instructions below to explore our demos. This also serves as a great way to verify that the developer’s environment is set up correctly.
Note
Currently Edgematic is in beta and available for free on the Amazon Web Services (AWS) Marketplace. To obtain access, click link. To sign up, you will need an AWS account.
Log into Edgematic, create a new project called demo, on the right hand side Catalog tab, find yolo_v5_ethernet application under SiMa and drag it into the Canvas. Then hit the play button the top right corner of the page.
The Multichannel Vision AI demo highlights the SiMa platform’s real-time processing of 16 video streams, running multiple models simultaneously such as YOLOv9s, YOLOv7, YOLOv8, and pose estimation.
This prebuilt demo uses OptiView — a tool that streamlines Vision AI ML pipeline development. On the host side, an installable package integrates MediaMTX, an open-source media streaming server, to deliver multiple RTSP channels to the DevKit.
Developers who prefer to build the demo from source can download the Palette SDK and use the MPK tools to compile and deploy the pipeline. See step 5 for detailed instructions.
This demo is compatible with Modalix platform.
Note
To install the demo, ensure the DevKit is connected to the Internet. Once installed, it can run entirely offline.
Modalix DevKit is preloaded with this demo, if the developer is unboxing a new Modalix DevKit, open http://<modalix-ip>:8800 from the browser to try the Vision AI demo and skip the rest of the installation instruction.
Application Architecture
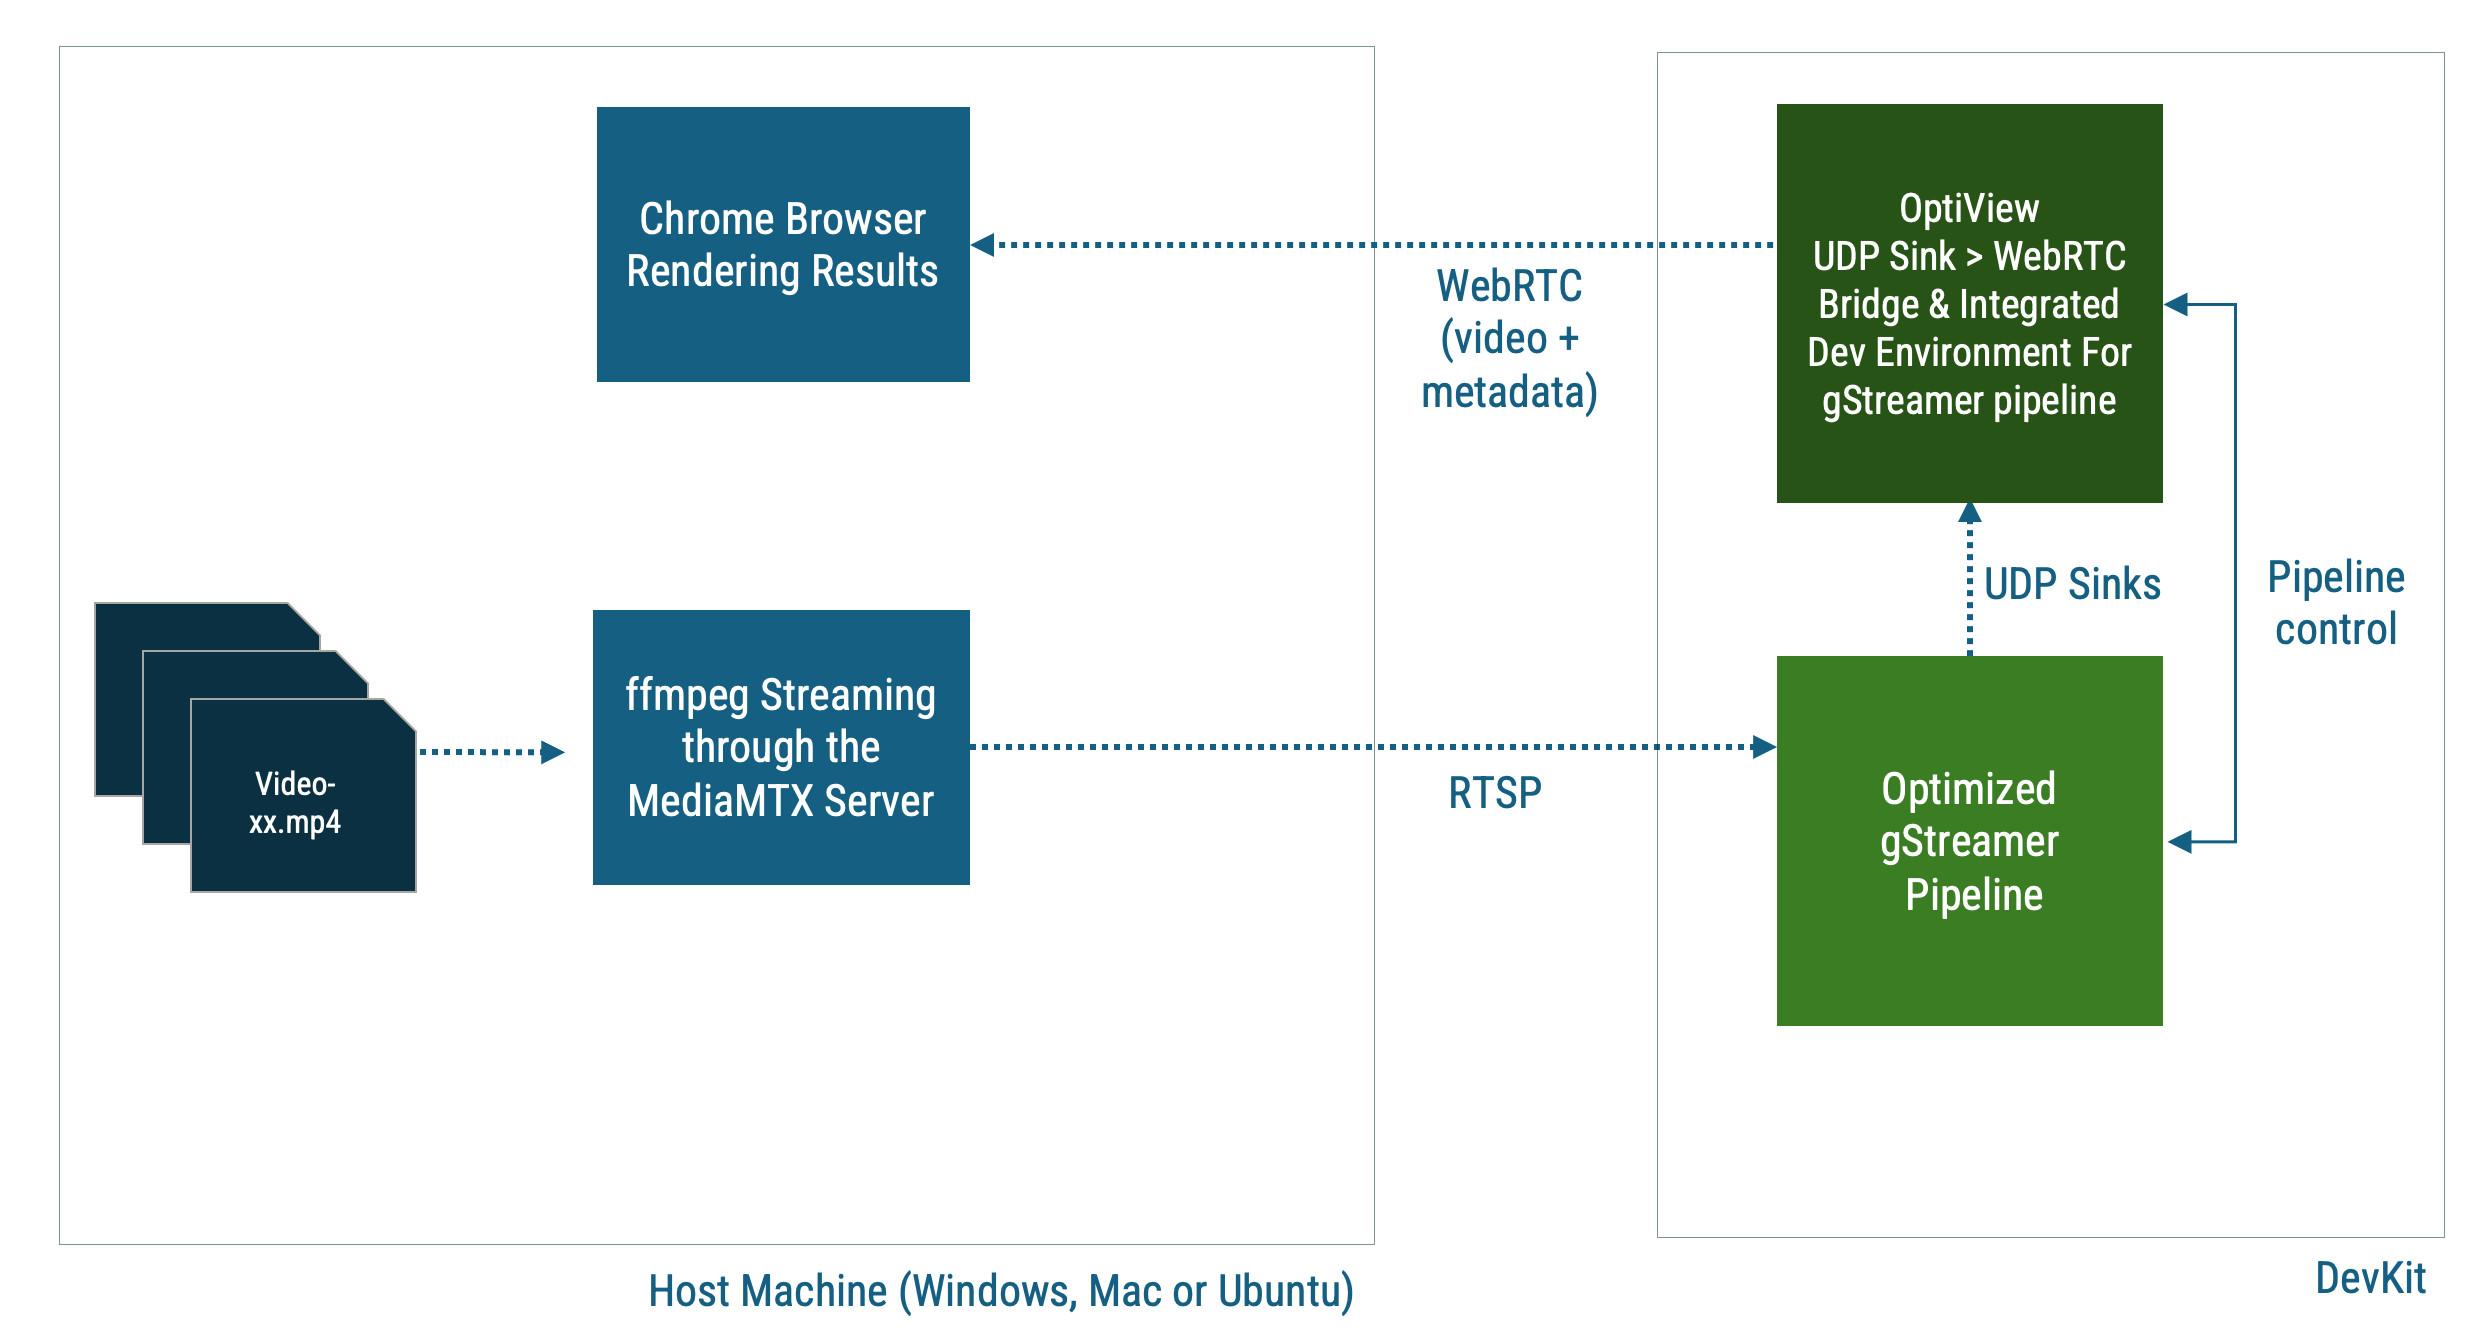
Multi-channel Vision AI Demo Architecture
Step 1. Install And Run RTSP Media Source On The Host
The following instruction applies to macOS and Ubuntu Linux
user@host-machine:~$ mkdir multisrc && cd multisrc && sima-cli install assets/multi-video-sources
user@host-machine:~$ cd multivideo-sources-scripts/
user@host-machine:~$ open preview.html
user@host-machine:~$ ./mediasrc.sh ../videos-720p16
This script will automatically install FFMPEG and MediaMTX on the host if they are not already installed. The
open preview.htmlcommand allows the developer to view the RTSP streams in a browser to ensure they are indeed active.
The following instruction applies to Windows
On Windows platform, open PowerShell and run the
mediasrc.batfile instead of themediasrc.shfile.user@host-machine:C:\Users\sima\> mkdir multisrc && cd multisrc && sima-cli install assets/multi-video-sources user@host-machine:C:\Users\sima\> cd multivideo-sources-scripts/ user@host-machine:C:\Users\sima\> ii preview.html user@host-machine:C:\Users\sima\> .\mediasrc.bat ..\videos-720p16\
Step 2. Install Pre-built Pipeline On The Modalix DevKit
Install on Modalix
modalix:~$ cd /tmp
modalix:~$ sima-cli install -v 2.0.0 samples/multichannel
During the installation, the developer will be prompted to enter the RTSP source IP. Use the Host IP from the previous step.
Step 3. Install And Run OptiView On The DevKit
The Modalix DevKit comes with OptiView preloaded from the factory.
Before attempting to install OptiView, type optiview in the shell to check if it is already installed. If not installed, then run the following command to install it.
modalix:~$ sima-cli install optiview
modalix:~$ source ~/.bash_profile
modalix:~$ optiview
When prompted to enter password, use the default password edgeai. The developer will then see instructions on how to access OptiView.
Step 4. Run The Pipeline From OptiView
Once the developer gained access to OptiView using a Chrome browser, select pipeline-multichannel, then click the Rocket icon in the toolbar. If the pipeline starts successfully, the rocket will display a launch animation.
A log window will also appear, allowing developers to monitor the pipeline status.
Next, click the TV icon in the bottom-left corner to view the results.
Note that this multichannel pipeline may take up to 30 seconds to fully start.
Step 5. Compile The Pipeline
Once the developer have verified that the prebuilt pipeline runs on the DevKit and can receive and process multiple RTSP streams, the developer can customize and compile the pipeline by following these steps:
Before proceeding, ensure that the Palette SDK 2.0 is installed on the host machine. The source code of this demo resides on GitHub.
Download Pipeline Source Code & Models
sima-user@docker-image-id:~$ sima-cli install gh:sima-ai/pipeline-multichannel
At the end of the installation enter the IP address of the RTSP source host when prompted.
Build Pipeline
sima-user@docker-image-id:~$ cd pipeline-multichannel
sima-user@docker-image-id:~$ mpk create -s . -d . --clean --board-type modalix
Deploy Pipeline
sima-user@docker-image-id:~$ mpk device connect -t sima@devkit-ip
sima-user@docker-image-id:~$ mpk deploy -f project.mpk
After the pipeline is deployed, the developer can still use OptiView to control and run the pipeline.
This demo, nicknamed llima, integrates live image capture, voice input, and text input to enable seamless multimodal interaction powered by the Gemma 3 model. It also includes support for Retrieval-Augmented Generation (RAG) functionality.
Note
This instruction is compatible only with the Modalix DevKit. To install this demo on Modalix Early Access Kit, refer to this page.
To install the demo, ensure the DevKit is connected to the Internet. Once installed, it can run entirely offline.
Modalix DevKit is preloaded with this demo, if the developer is unboxing a new Modalix DevKit, open http://<modalix-ip>:8800 from the browser to try the LLiMa demo and skip the rest of the installation instruction.
Note
Please install or upgrade sima-cli before continuing. This guide is intended for use with the latest sima-cli version.
Application Architecture
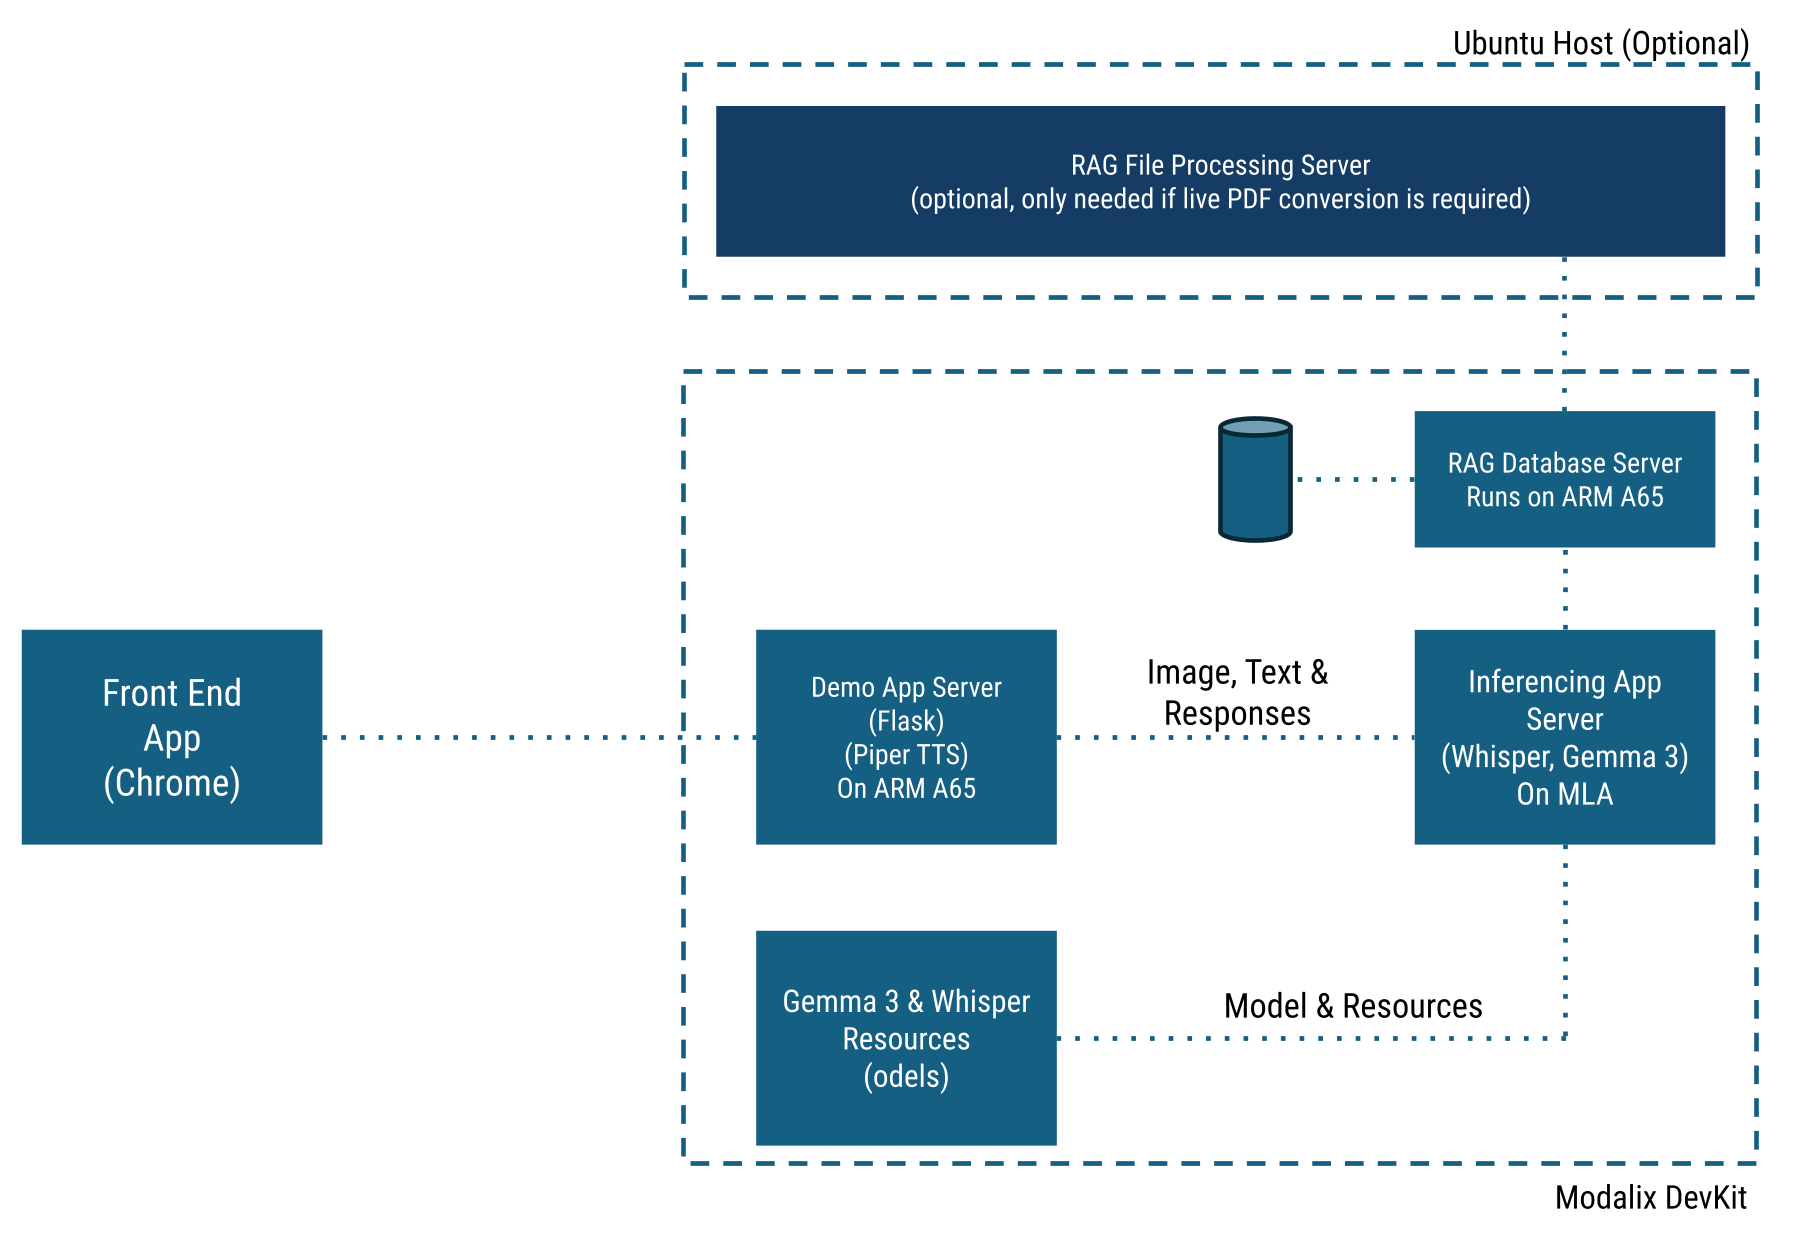
LLiMa Software Architecture
Install The Application On Modalix DevKit
Before proceeding, make sure the NVMe drive is mounted. The Modalix DevKit comes with a pre-formatted 500GB NVMe drive. If the developer is using a larger or new NVMe drive, refer to this guide.
modalix:~$ sima-cli nvme remount
modalix:~$ cd /media/nvme/ && mkdir -p llima && cd llima
modalix:~$ sima-cli install -v 2.0.0 samples/llima
This command downloads the necessary models and application components, organizing them under the /media/nvme/llima directory.
Upon successful installation, the developer will see instructions on how to launch the demo.
modalix:~$ cd simaai-genai-demo && ./run.sh
To access the demo, open Chrome on the desktop and navigate to: https://<modalix-ip>:5000.
By default context history is enabled. You have to refresh the chat to send seperate messages without context from previous messages.
CLI mode allows users to test the model locally without relying on another machine. However, it only supports text and image interactions.
To run the demo in CLI mode, use the following command:
modalix:~$ cd simaai-genai-demo && ./run.sh -cli
Install the RAG File Processing Server on Ubuntu
Optionally, the developer can install a RAG File Processing Server on a Ubuntu machine that the Modalix DevKit can access over the network.
This allows users to upload .txt, .pdf, or .md files to the server, where text embeddings are generated and transferred to
the Modalix DevKit for runtime RAG-based search.
user@ubuntu-host-machine:~$ mkdir ragfps && cd ragfps
user@ubuntu-host-machine:~$ sima-cli install assets/llm-demo-assets/rfps
Upon successful installation, the CLI will display instructions to run the RAG File Processing Server:
user@ubuntu-host-machine:~$ cd simaai-genai-ragfps && source .venv/bin/activate
user@ubuntu-host-machine:~$ python3 main.py
To run the demo with the RAG File Processing Server enabled:
modalix:~$ cd simaai-genai-demo && ./run.sh --ragfps <ubuntu server IP>